The SDk and tool is at following link :
Click Here
Thursday, July 16, 2009

Open XML : Image Part in the Word document
To insert image in the word document. Use reflector tool which comes with Open Xml 2.0 SDk. it will make great help in generatin the code. For inserting a image use below steps:
1. Create a blanck word dcoument.
2. Copy paste the image(which you want to insert).
3. The go to DocumentReflectorTool.
4. Open this document in that tool. copy the image code.
5. Add following code to solution:
ImagePart imgPart = mainPart.AddImagePart(ImagePartType.Jpeg);
using (FileStream strem = new FileStream(@"C:\Bharat.JPG", FileMode.Open))
{
imgPart.FeedData(strem);
}
imagePartID = mainPart.GetIdOfPart(imgPart);
mainPart.AddExtendedPart ("http://schemas.openxmlformats.org/officeDocument/2006/relationships/image", "media/image1.jpeg", imagePartID);
Paragraph ImageParagraph = new Paragraph();
body.Append(new Paragraph(new Run(GenerateDrawing())));
Copied code from reflector tool :
public static Drawing GenerateDrawing()
{
var element =
new Drawing(
new wp.Inline(
new wp.Extent(){ Cx = 536575L, Cy = 407670L },
new wp.EffectExtent(){ LeftEdge = 19050L, TopEdge = 0L, RightEdge = 0L, BottomEdge = 0L },
new wp.DocProperties(){ Id = (UInt32Value)1U, Name = "Picture 1", Description = "C:\\Bharat.JPG" },
new wp.NonVisualGraphicFrameDrawingProperties(
new a.GraphicFrameLocks(){ NoChangeAspect = true }),
new a.Graphic(
new a.GraphicData(
new pic.Picture(
new pic.NonVisualPictureProperties(
new pic.NonVisualDrawingProperties(){ Id = (UInt32Value)0U, Name = "Picture 1", Description = "C:\\Bharat.JPG" },
new pic.NonVisualPictureDrawingProperties(
new a.PictureLocks(){ NoChangeAspect = true, NoChangeArrowheads = true })),
new pic.BlipFill(
new a.Blip() { Embed = imagePartID, CompressionState = a.BlipCompressionValues.Print },
new a.SourceRectangle(),
new a.Stretch(
new a.FillRectangle())),
new pic.ShapeProperties(
new a.Transform2D(
new a.Offset(){ X = 0L, Y = 0L },
new a.Extents(){ Cx = 536575L, Cy = 407670L }),
new a.PresetGeometry(
new a.AdjustValueList()
){ Preset = a.ShapeTypeValues.Rectangle },
new a.NoFill(),
new a.Outline(
new a.NoFill(),
new a.Miter(){ Limit = 800000 },
new a.HeadEnd(),
new a.TailEnd()
){ Width = 9525 }
){ BlackWhiteMode = a.BlackWhiteModeValues.Auto })
){ Uri = "http://schemas.openxmlformats.org/drawingml/2006/picture" })
){ DistanceFromTop = (UInt32Value)0U, DistanceFromBottom = (UInt32Value)0U, DistanceFromLeft = (UInt32Value)0U, DistanceFromRight = (UInt32Value)0U });
return element;
}
1. Create a blanck word dcoument.
2. Copy paste the image(which you want to insert).
3. The go to DocumentReflectorTool.
4. Open this document in that tool. copy the image code.
5. Add following code to solution:
ImagePart imgPart = mainPart.AddImagePart(ImagePartType.Jpeg);
using (FileStream strem = new FileStream(@"C:\Bharat.JPG", FileMode.Open))
{
imgPart.FeedData(strem);
}
imagePartID = mainPart.GetIdOfPart(imgPart);
mainPart.AddExtendedPart ("http://schemas.openxmlformats.org/officeDocument/2006/relationships/image", "media/image1.jpeg", imagePartID);
Paragraph ImageParagraph = new Paragraph();
body.Append(new Paragraph(new Run(GenerateDrawing())));
Copied code from reflector tool :
public static Drawing GenerateDrawing()
{
var element =
new Drawing(
new wp.Inline(
new wp.Extent(){ Cx = 536575L, Cy = 407670L },
new wp.EffectExtent(){ LeftEdge = 19050L, TopEdge = 0L, RightEdge = 0L, BottomEdge = 0L },
new wp.DocProperties(){ Id = (UInt32Value)1U, Name = "Picture 1", Description = "C:\\Bharat.JPG" },
new wp.NonVisualGraphicFrameDrawingProperties(
new a.GraphicFrameLocks(){ NoChangeAspect = true }),
new a.Graphic(
new a.GraphicData(
new pic.Picture(
new pic.NonVisualPictureProperties(
new pic.NonVisualDrawingProperties(){ Id = (UInt32Value)0U, Name = "Picture 1", Description = "C:\\Bharat.JPG" },
new pic.NonVisualPictureDrawingProperties(
new a.PictureLocks(){ NoChangeAspect = true, NoChangeArrowheads = true })),
new pic.BlipFill(
new a.Blip() { Embed = imagePartID, CompressionState = a.BlipCompressionValues.Print },
new a.SourceRectangle(),
new a.Stretch(
new a.FillRectangle())),
new pic.ShapeProperties(
new a.Transform2D(
new a.Offset(){ X = 0L, Y = 0L },
new a.Extents(){ Cx = 536575L, Cy = 407670L }),
new a.PresetGeometry(
new a.AdjustValueList()
){ Preset = a.ShapeTypeValues.Rectangle },
new a.NoFill(),
new a.Outline(
new a.NoFill(),
new a.Miter(){ Limit = 800000 },
new a.HeadEnd(),
new a.TailEnd()
){ Width = 9525 }
){ BlackWhiteMode = a.BlackWhiteModeValues.Auto })
){ Uri = "http://schemas.openxmlformats.org/drawingml/2006/picture" })
){ DistanceFromTop = (UInt32Value)0U, DistanceFromBottom = (UInt32Value)0U, DistanceFromLeft = (UInt32Value)0U, DistanceFromRight = (UInt32Value)0U });
return element;
}
Open XML : Styles in the Word document
Styles are the important part of the word document. When we create paragraph or link or other component in the word document we have to set some styles on that components like Hyperlink,Heading1,23.. or Title etc.
For this we have to do some exercise like as follows :
1. Create a word documents
2. Insert all the styles like in image.
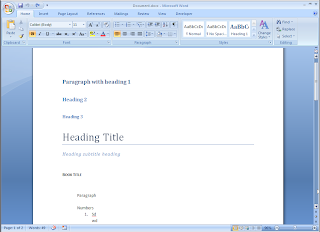
3. Save the document.
4. Rename the document(DocName.docx to DocName.zip)
5. Extract the document.
6. Go to DocName\Word folder
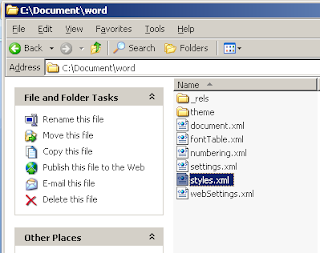
7. Copy the styles.xml and paste in the solution.
8. Write the below code to use in our solution
StyleDefinitionsPart styleDefinitionsPart = mainPart.AddNewPart();
//File Styles Uploading : Location of style c:\\styles.xml
FileStream stylesTemplate = new FileStream("c:\\styles.xml", FileMode.Open, FileAccess.Read);
styleDefinitionsPart.FeedData(stylesTemplate);
styleDefinitionsPart.Styles.Save();
9. When we want to append Heading 1 with our para then we can use like :
Paragraph AuthorPara = new Paragraph();
Run run = new Run();
Text TextLine = new Text("Created by: " + System.Environment.UserName);
run4.Append(TextLine);
AuthorPara.Append(new ParagraphProperties (new ParagraphStyleId (){Val="Heading1"}), run);
This is the way we can append styles to our created document.
For this we have to do some exercise like as follows :
1. Create a word documents
2. Insert all the styles like in image.

3. Save the document.
4. Rename the document(DocName.docx to DocName.zip)
5. Extract the document.
6. Go to DocName\Word folder

7. Copy the styles.xml and paste in the solution.
8. Write the below code to use in our solution
StyleDefinitionsPart styleDefinitionsPart = mainPart.AddNewPart
//File Styles Uploading : Location of style c:\\styles.xml
FileStream stylesTemplate = new FileStream("c:\\styles.xml", FileMode.Open, FileAccess.Read);
styleDefinitionsPart.FeedData(stylesTemplate);
styleDefinitionsPart.Styles.Save();
9. When we want to append Heading 1 with our para then we can use like :
Paragraph AuthorPara = new Paragraph();
Run run = new Run();
Text TextLine = new Text("Created by: " + System.Environment.UserName);
run4.Append(TextLine);
AuthorPara.Append(new ParagraphProperties (new ParagraphStyleId (){Val="Heading1"}), run);
This is the way we can append styles to our created document.
Wednesday, July 15, 2009
Open XML : Adding Hyperlink to word document by WordProcessingML
To add hyperlink in the Microsoft word document. We have to write following code:
using (WordprocessingDocument WorDocument = WordprocessingDocument.Create(@"c:\Test.docx", WordprocessingDocumentType.Document))
{
// Add a new main document part.
MainDocumentPart mainPart = WorDocument.AddMainDocumentPart();
//Create Document tree for simple document.
mainPart.Document = new Document();
//Create Body (this element contains other elements that we want to include
Body body = new Body();
//Hyperlink to add
Paragraph HprPara = new Paragraph(
new Hyperlink(
new Run(
new RunProperties(
new RunStyleId(){ Val = "Hyperlink" }),
new Text("TestLink")
){ RsidRunProperties = "00356238" }
){ History = BooleanValues.One, Id = "rId4" }
){ RsidParagraphAddition = "00651E0C", RsidRunAdditionDefault = "00356238" };
//External realationship to make for hyperlink
ExternalRelationship exprRealationship = mainPart.AddExternalRelationship("http://schemas.openxmlformats.org/officeDocument/2006/relationships/hyperlink", new Uri("http://www.google.com"), "rId4");
body.Append(HprPara);
mainPart.Document.Append(body);
// Save changes to the main document part.
mainPart.Document.Save();
}
using (WordprocessingDocument WorDocument = WordprocessingDocument.Create(@"c:\Test.docx", WordprocessingDocumentType.Document))
{
// Add a new main document part.
MainDocumentPart mainPart = WorDocument.AddMainDocumentPart();
//Create Document tree for simple document.
mainPart.Document = new Document();
//Create Body (this element contains other elements that we want to include
Body body = new Body();
//Hyperlink to add
Paragraph HprPara = new Paragraph(
new Hyperlink(
new Run(
new RunProperties(
new RunStyleId(){ Val = "Hyperlink" }),
new Text("TestLink")
){ RsidRunProperties = "00356238" }
){ History = BooleanValues.One, Id = "rId4" }
){ RsidParagraphAddition = "00651E0C", RsidRunAdditionDefault = "00356238" };
//External realationship to make for hyperlink
ExternalRelationship exprRealationship = mainPart.AddExternalRelationship("http://schemas.openxmlformats.org/officeDocument/2006/relationships/hyperlink", new Uri("http://www.google.com"), "rId4");
body.Append(HprPara);
mainPart.Document.Append(body);
// Save changes to the main document part.
mainPart.Document.Save();
}
Tuesday, July 14, 2009
Open XML : Working with WordProcessingML
To create word document from the open xml (packaging class) is quiet tedious job. MS provided a DocumentFormat.OpenXml assembly for Open XML work. This assembly provides object for Microsoft Word, Microsoft Excel, and Microsoft PowerPoint. It will make easy to developer to create word, excel or PowerPoint reports programmatically.
Add DocumentFormat.OpenXml assembly and start working on creation of the reports. This assembly is provided by the open xml SDK 2.0. It can be downloaded from the Microsoft download center.
The following references are used for creation of the word document from this assembly.
using DocumentFormat.OpenXml.Packaging;
using DocumentFormat.OpenXml.Wordprocessing;
We can first start with simple adding text in the word document from the code. To add text in the word document add the assembly reference and then add above namespaces:
First create a paragraph object and set its properties like below
using (WordprocessingDocument WorDocument = WordprocessingDocument.Create(@"c:\Test.docx", WordprocessingDocumentType.Document))
{
// Add a new main document part.
MainDocumentPart mainPart = WorDocument.AddMainDocumentPart();
//Create Document tree for simple document.
mainPart.Document = new Document();
//Create Body (this element contains other elements that we want to include
Body body = new Body();
FontSize fontsize = new FontSize();
fontsize.Val = 38;
Color TextColor = new Color();
TextColor.Val = "4F81BD";
Bold boldFont = new Bold();
boldFont.Val = DocumentFormat.OpenXml.Wordprocessing.BooleanValues.On;
Paragraph AuthorPara = new Paragraph();
Run run = new Run();
Text TextLine = new Text("Created by: " + System.Environment.UserName);
run.Append(TextLine);
AuthorPara.Append(run);
RunProperties runProps = new RunProperties();
RunFonts runFonts = new RunFonts();
runFonts.Ascii = "Segoe UI";
runProps.Append(fontsize);
runProps.Append(runFonts);
runProps.Append(boldFont);
runProps.Append(TextColor);
run4.PrependChild(runProps);
body.Append(AuthorPara);
mainPart.Document.Append(body);
// Save changes to the main document part.
mainPart.Document.Save();
}
For creating table in the word document create table object and set properties as below
Table object and properties
Table table = new Table();
TableProperties tblPr = new TableProperties();
TableBorders tblBorders = new TableBorders();
TableWidth tblWidth = new TableWidth();
tblWidth.Width = 550;
tblBorders.TopBorder = new TopBorder();
tblBorders.TopBorder.Val = new EnumValue(BorderValues.BasicBlackDots);
tblBorders.BottomBorder = new BottomBorder();
tblBorders.BottomBorder.Val = new EnumValue(BorderValues.BasicBlackDots);
tblBorders.LeftBorder = new LeftBorder();
tblBorders.LeftBorder.Val = new EnumValue(BorderValues.BasicBlackDots);
tblBorders.RightBorder = new RightBorder();
tblBorders.RightBorder.Val = new EnumValue(BorderValues.BasicBlackDots);
tblBorders.InsideHorizontalBorder = new InsideHorizontalBorder();
tblBorders.InsideHorizontalBorder.Val = BorderValues.Single;
tblBorders.InsideVerticalBorder = new InsideVerticalBorder();
tblBorders.InsideVerticalBorder.Val = BorderValues.Single;
tblPr.Append(tblBorders);
table.Append(tblPr);
tblPr = new TableProperties();
tblPr.Append(tblWidth);
Create new table row and table cell
//Table Start
TableRow tr = new TableRow();
TableCell tc = new TableCell(AuthorPara);//Paragraph above
TableCellWidth tblCellWidth = new TableCellWidth();
tblCellWidth.Width = 600;
TableCellProperties tcp = new TableCellProperties();
GridSpan griedSpan = new GridSpan();
griedSpan.Val = 11;
tcp.Append(griedSpan);
tcp.Append(tblCellWidth);
tc.Append(tcp);
tr.Append(tc);
table.Append(tr);
In this way table can be created in the open xml using wordprocessingML
Add DocumentFormat.OpenXml assembly and start working on creation of the reports. This assembly is provided by the open xml SDK 2.0. It can be downloaded from the Microsoft download center.
The following references are used for creation of the word document from this assembly.
using DocumentFormat.OpenXml.Packaging;
using DocumentFormat.OpenXml.Wordprocessing;
We can first start with simple adding text in the word document from the code. To add text in the word document add the assembly reference and then add above namespaces:
First create a paragraph object and set its properties like below
using (WordprocessingDocument WorDocument = WordprocessingDocument.Create(@"c:\Test.docx", WordprocessingDocumentType.Document))
{
// Add a new main document part.
MainDocumentPart mainPart = WorDocument.AddMainDocumentPart();
//Create Document tree for simple document.
mainPart.Document = new Document();
//Create Body (this element contains other elements that we want to include
Body body = new Body();
FontSize fontsize = new FontSize();
fontsize.Val = 38;
Color TextColor = new Color();
TextColor.Val = "4F81BD";
Bold boldFont = new Bold();
boldFont.Val = DocumentFormat.OpenXml.Wordprocessing.BooleanValues.On;
Paragraph AuthorPara = new Paragraph();
Run run = new Run();
Text TextLine = new Text("Created by: " + System.Environment.UserName);
run.Append(TextLine);
AuthorPara.Append(run);
RunProperties runProps = new RunProperties();
RunFonts runFonts = new RunFonts();
runFonts.Ascii = "Segoe UI";
runProps.Append(fontsize);
runProps.Append(runFonts);
runProps.Append(boldFont);
runProps.Append(TextColor);
run4.PrependChild
body.Append(AuthorPara);
mainPart.Document.Append(body);
// Save changes to the main document part.
mainPart.Document.Save();
}
For creating table in the word document create table object and set properties as below
Table object and properties
Table table = new Table();
TableProperties tblPr = new TableProperties();
TableBorders tblBorders = new TableBorders();
TableWidth tblWidth = new TableWidth();
tblWidth.Width = 550;
tblBorders.TopBorder = new TopBorder();
tblBorders.TopBorder.Val = new EnumValue
tblBorders.BottomBorder = new BottomBorder();
tblBorders.BottomBorder.Val = new EnumValue
tblBorders.LeftBorder = new LeftBorder();
tblBorders.LeftBorder.Val = new EnumValue
tblBorders.RightBorder = new RightBorder();
tblBorders.RightBorder.Val = new EnumValue
tblBorders.InsideHorizontalBorder = new InsideHorizontalBorder();
tblBorders.InsideHorizontalBorder.Val = BorderValues.Single;
tblBorders.InsideVerticalBorder = new InsideVerticalBorder();
tblBorders.InsideVerticalBorder.Val = BorderValues.Single;
tblPr.Append(tblBorders);
table.Append(tblPr);
tblPr = new TableProperties();
tblPr.Append(tblWidth);
Create new table row and table cell
//Table Start
TableRow tr = new TableRow();
TableCell tc = new TableCell(AuthorPara);//Paragraph above
TableCellWidth tblCellWidth = new TableCellWidth();
tblCellWidth.Width = 600;
TableCellProperties tcp = new TableCellProperties();
GridSpan griedSpan = new GridSpan();
griedSpan.Val = 11;
tcp.Append(griedSpan);
tcp.Append(tblCellWidth);
tc.Append(tcp);
tr.Append(tc);
table.Append(tr);
In this way table can be created in the open xml using wordprocessingML
Thursday, July 9, 2009
Question Tips 4 !
Hi all,
The another list of question on SharePoint
1. What is SPServerUpdate?
A: Causes the server to save its state and propagate the changes to all computers in the server farm.
2. Fetching data from multiple list. How?
3. SPBatch some thing like that ?
4. Deployment of the Work flow and web parts.
5. What is web part?
6. What is workflow?
7. Imp : Flow of SharePoint?
8. What is SPSiteData Query?
A: Represents a query that can be performed across multiple lists in multiple Web sites in the same Web site collection.
9. What is defference between in Method and Activity?
The another list of question on SharePoint
1. What is SPServerUpdate?
A: Causes the server to save its state and propagate the changes to all computers in the server farm.
2. Fetching data from multiple list. How?
3. SPBatch some thing like that ?
4. Deployment of the Work flow and web parts.
5. What is web part?
6. What is workflow?
7. Imp : Flow of SharePoint?
8. What is SPSiteData Query?
A: Represents a query that can be performed across multiple lists in multiple Web sites in the same Web site collection.
9. What is defference between in Method and Activity?
Tuesday, July 7, 2009
Number of days calculation in InfoPath
For number of days calculation, total days and total number of working days. Do the following steps :
1. Design the form like below

2. Add the below code in the button events
public void WorkingDays_Clicked(object sender, ClickedEventArgs e)
{
int CalculateDays = 1;
XPathNavigator Main = MainDataSource.CreateNavigator();
DateTime startDate = DateTime.Parse(Main.SelectSingleNode("/my:myFields/my:StartDate",NamespaceManager).Value);
DateTime endDate = DateTime.Parse(Main.SelectSingleNode("/my:myFields/my:EndDate", NamespaceManager).Value);
TimeSpan span =endDate.Subtract(startDate);
for(int i= 1;i<=span.Days;i++)
{
startDate = startDate.AddDays(1);
if(startDate.DayOfWeek !=DayOfWeek.Sunday && startDate.DayOfWeek !=DayOfWeek.Saturday)
{
CalculateDays++;
}
}
Main.SelectSingleNode("/my:myFields/my:WorkingDays",NamespaceManager).SetValue(CalculateDays.ToString());
}
public void TotalDays_Clicked(object sender, ClickedEventArgs e)
{
int CalculateDays = 1;
XPathNavigator Main = MainDataSource.CreateNavigator();
DateTime startDate = DateTime.Parse(Main.SelectSingleNode("/my:myFields/my:StartDate", NamespaceManager).Value);
DateTime endDate = DateTime.Parse(Main.SelectSingleNode("/my:myFields/my:EndDate", NamespaceManager).Value);
TimeSpan span = endDate.Subtract(startDate);
for (int i = 1; i <= span.Days; i++)
{
startDate = startDate.AddDays(1);
CalculateDays++;
}
Main.SelectSingleNode("/my:myFields/my:TotalDays", NamespaceManager).SetValue(CalculateDays.ToString());
}
1. Design the form like below

2. Add the below code in the button events
public void WorkingDays_Clicked(object sender, ClickedEventArgs e)
{
int CalculateDays = 1;
XPathNavigator Main = MainDataSource.CreateNavigator();
DateTime startDate = DateTime.Parse(Main.SelectSingleNode("/my:myFields/my:StartDate",NamespaceManager).Value);
DateTime endDate = DateTime.Parse(Main.SelectSingleNode("/my:myFields/my:EndDate", NamespaceManager).Value);
TimeSpan span =endDate.Subtract(startDate);
for(int i= 1;i<=span.Days;i++)
{
startDate = startDate.AddDays(1);
if(startDate.DayOfWeek !=DayOfWeek.Sunday && startDate.DayOfWeek !=DayOfWeek.Saturday)
{
CalculateDays++;
}
}
Main.SelectSingleNode("/my:myFields/my:WorkingDays",NamespaceManager).SetValue(CalculateDays.ToString());
}
public void TotalDays_Clicked(object sender, ClickedEventArgs e)
{
int CalculateDays = 1;
XPathNavigator Main = MainDataSource.CreateNavigator();
DateTime startDate = DateTime.Parse(Main.SelectSingleNode("/my:myFields/my:StartDate", NamespaceManager).Value);
DateTime endDate = DateTime.Parse(Main.SelectSingleNode("/my:myFields/my:EndDate", NamespaceManager).Value);
TimeSpan span = endDate.Subtract(startDate);
for (int i = 1; i <= span.Days; i++)
{
startDate = startDate.AddDays(1);
CalculateDays++;
}
Main.SelectSingleNode("/my:myFields/my:TotalDays", NamespaceManager).SetValue(CalculateDays.ToString());
}
Friday, July 3, 2009
Using SPQuery in SharePoint object model
SPSite rootSite = new SPSite("http://mossvs2008");
SPWeb SubSite = rootSite.AllWebs["LeaveSite"];
string strTitleValue = string.Empty;
Console.WriteLine("Please enter Employee ID");
strTitleValue = Console.ReadLine();
SPList SPList = SubSite.Lists["Employee List"];
SPQuery query = new SPQuery();
query.Query = <Where><Eq<>FieldRef Name='Title' /><Value Type='Text'>"+strTitleValue+">/Value>>/Eq></Where>";>/
SPListItemCollection itemcol = SPList.GetItems(query);
string strTitle = string.Empty;
string strDesignation = string.Empty;
string strEmployeeName = string.Empty;
foreach (SPListItem item in itemcol)
{
strTitle = item["Title"].ToString();
strDesignation = item["Designation"].ToString();
strEmployeeName = item["Employee Name"].ToString();
}
Console.WriteLine("Employee ID.........");
Console.WriteLine(strTitle);
Console.WriteLine("Employee Designation.");
Console.WriteLine(strDesignation);
Console.WriteLine("Employee Name........");
Console.WriteLine(strEmployeeName);
SPWeb SubSite = rootSite.AllWebs["LeaveSite"];
string strTitleValue = string.Empty;
Console.WriteLine("Please enter Employee ID");
strTitleValue = Console.ReadLine();
SPList SPList = SubSite.Lists["Employee List"];
SPQuery query = new SPQuery();
query.Query = <Where><Eq<>FieldRef Name='Title' /><Value Type='Text'>"+strTitleValue+">/Value>>/Eq></Where>";>/
SPListItemCollection itemcol = SPList.GetItems(query);
string strTitle = string.Empty;
string strDesignation = string.Empty;
string strEmployeeName = string.Empty;
foreach (SPListItem item in itemcol)
{
strTitle = item["Title"].ToString();
strDesignation = item["Designation"].ToString();
strEmployeeName = item["Employee Name"].ToString();
}
Console.WriteLine("Employee ID.........");
Console.WriteLine(strTitle);
Console.WriteLine("Employee Designation.");
Console.WriteLine(strDesignation);
Console.WriteLine("Employee Name........");
Console.WriteLine(strEmployeeName);
Thursday, July 2, 2009
Change the Top Tool Bar color in FormServer.aspx page in SharePoint 2007
To change the color of the toolbar in the InfoPath formserver.aspx page in SharePoint2007 follow these steps:
1. Go to following location "C:\Program Files\Common Files\Microsoft Shared\web server extensions\12\TEMPLATE\LAYOUTS".
2. Open the page "FormServer.aspx" in notepad.
3. Write the tag of scripting below page directive and copy paste this below script
//function changeColor()
//{
//document.getElementById("__toolbar_top").style.backgroundColor = "#E96A37";
//}
4. Call this function in the body OnLoad event tage of the page.
body OnLoad="javascript:changeColor()" style="margin: 0px;overflow:auto;"
5. The resultant change in the page
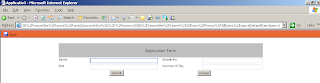
We have to adopt this approach because there is no css class is attached with this div. Inline styles are written instead of CSS Class.
1. Go to following location "C:\Program Files\Common Files\Microsoft Shared\web server extensions\12\TEMPLATE\LAYOUTS".
2. Open the page "FormServer.aspx" in notepad.
3. Write the tag of scripting below page directive and copy paste this below script
//function changeColor()
//{
//document.getElementById("__toolbar_top").style.backgroundColor = "#E96A37";
//}
4. Call this function in the body OnLoad event tage of the page.
body OnLoad="javascript:changeColor()" style="margin: 0px;overflow:auto;"
5. The resultant change in the page

We have to adopt this approach because there is no css class is attached with this div. Inline styles are written instead of CSS Class.
To Show Submit Confirmation Message Box in Web Based InfoPath 2007
Pop up a message box using managed code(c#) in VSTA for a Browser-enabled infopath form,there is no proper solution. But for form submit we can show confirmation message box in InfoPath when form is submitted.
Follow below steps:
1. Design a form Blank or by template.
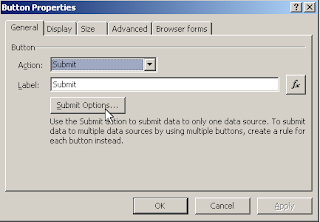
2. Drag a Button on form "Submit".
3. Goto Prperties of the button and change the action Rules and Code to Submit
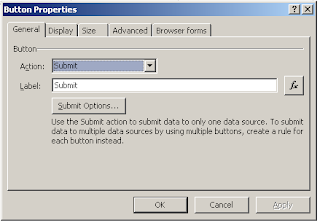
4. Click on Submit Options button
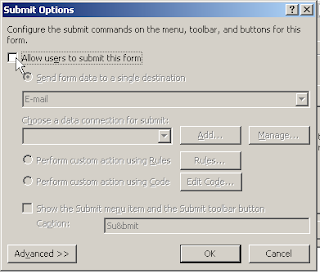
5. Click on Allow users to submit form
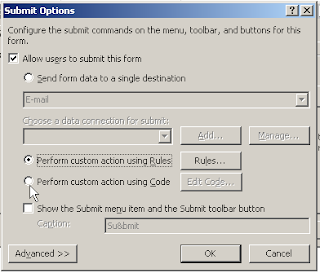
6. Click on Perform Custom Action using Code
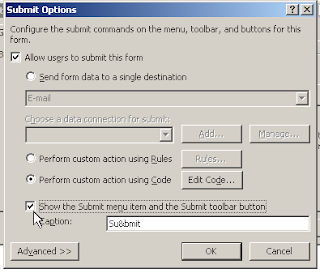
7. Click on Show the Submit menu item....
8. Click on Advance>> button
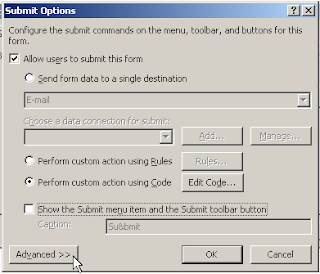
9. Click on Success and failure messgae
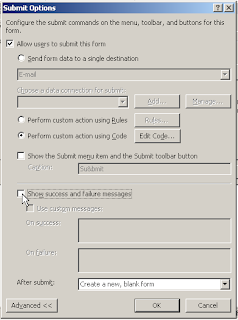
10. Click on Cutom messages
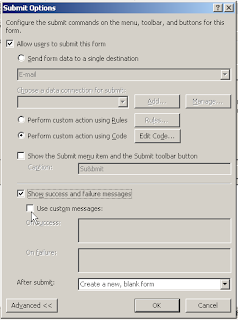
11. Write your custom messages and select After Submit drop down like Close the form
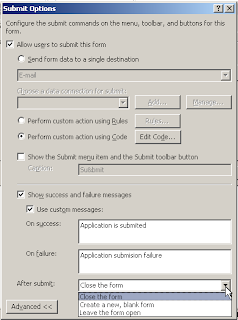
12. Click on Edit Code, it will take to submit button event.

The Message box looks lik as in image
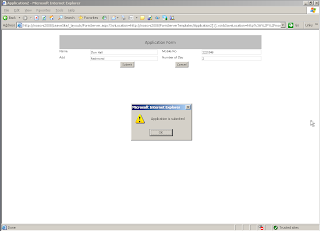
Follow below steps:
1. Design a form Blank or by template.
2. Drag a Button on form "Submit".
3. Goto Prperties of the button and change the action Rules and Code to Submit

4. Click on Submit Options button

5. Click on Allow users to submit form

6. Click on Perform Custom Action using Code

7. Click on Show the Submit menu item....

8. Click on Advance>> button

9. Click on Success and failure messgae

10. Click on Cutom messages

11. Write your custom messages and select After Submit drop down like Close the form

12. Click on Edit Code, it will take to submit button event.

The Message box looks lik as in image

Subscribe to:
Posts (Atom)